Introduction
Are you struggling to create a tailored experience for different user roles on your WordPress site? You’re not alone! Many site owners want to make their websites more dynamic and engaging by customizing styles for various users—like admins, editors, and subscribers—but don’t know where to start. The good news is that applying CSS based on user roles doesn’t have to be a daunting task. In this article, we’ll walk you through easy and effective methods to achieve just that. Whether you want to highlight important content for your team or provide a unique look for your visitors, we’ve got you covered. Get ready to unlock the full potential of your WordPress site by giving each user role a distinct flair. Let’s dive in and transform your site into a truly personalized experience!
Understanding User Roles in WordPress and Their Importance
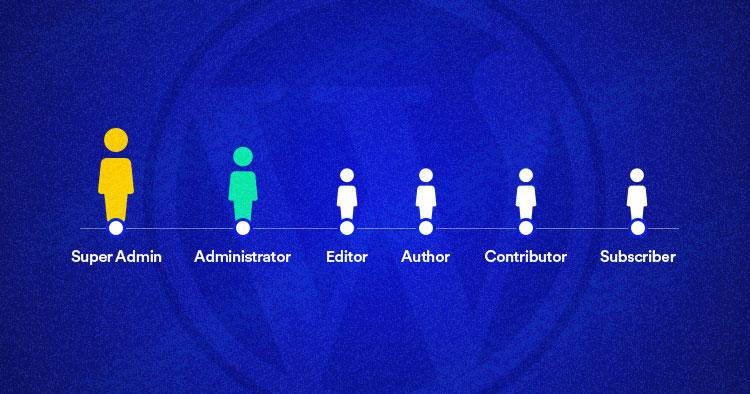
In WordPress, user roles play a crucial part in defining what users can and cannot do within your website. Understanding these roles is essential for maintaining security and ensuring that the right people have access to the right functionalities. At its core, WordPress has a set of default roles, each designed with specific capabilities:
- Administrator: Full control over the site, including all settings and features.
- Editor: Can publish and manage posts, including those written by others.
- Author: Can publish and manage their own posts.
- Contributor: Can write and manage their own posts but cannot publish them.
- Subscriber: Can manage their profile and read site content.
By understanding these roles, you can tailor your website’s appearance and functionality based on who logs in. For instance, if you want to apply specific CSS styles for different user roles, this customization can significantly enhance the user experience. Suppose you want a unique look for authors to highlight their contributions; you could easily apply styles that differentiate their posts from others.
Implementing CSS for specific user roles involves using conditional statements in your theme’s functions.php file or a custom plugin. Here’s a simple example of how to add custom CSS for authors:
function add_custom_css_for_authors() {
if ( current_user_can('author') ) {
echo '';
}
}
add_action('wp_head', 'add_custom_css_for_authors');
This approach not only enhances visual distinction but also reinforces the sense of community among users, as they feel recognized for their contributions. Additionally, you can adjust styles for other roles similarly, allowing you to create a dynamic and engaging user experience tailored to the specific needs of your site’s users.
| User Role | Capabilities |
|---|---|
| Administrator | Full access to all site features |
| Editor | Manage and publish all posts |
| Author | Publish own posts |
| Contributor | Write and manage own posts |
| Subscriber | Read content and manage profile |
By leveraging user roles effectively, you empower your community while also enhancing the aesthetic appeal of your site. This strategy not only streamlines user interactions but also helps to maintain a structured and organized environment that can adapt to the needs of different users.
Why Custom CSS is a Game Changer for Your Site
Custom CSS transforms your website from a generic template into a unique digital representation of your brand. With the ability to tailor styles for different user roles, you can enhance the user experience dramatically. Imagine a site where administrators see a clean, functional dashboard while subscribers enjoy a streamlined and engaging interface. This targeted approach not only improves usability but also fosters a sense of ownership and relevance for each user group.
By employing custom CSS, you’re not just changing aesthetics—you’re strategically guiding your visitors’ interactions with your site. For example, you can:
- Highlight important elements for admins, making navigation easier.
- Customize content visibility for different user groups, ensuring they see what matters most.
- Enhance accessibility by adjusting font sizes and colors based on user needs.
This tailored approach can drastically reduce confusion and increase engagement. Users are more likely to return to a site that feels personalized to them. Plus, custom CSS allows you to implement branding elements that resonate with specific audiences, reinforcing brand loyalty.
| User Role | Custom Style Example |
|---|---|
| Administrator | Bold dashboard widgets with bright colors |
| Editor | Subtle styling for content editing zones |
| Subscriber | Soft backgrounds for reading content |
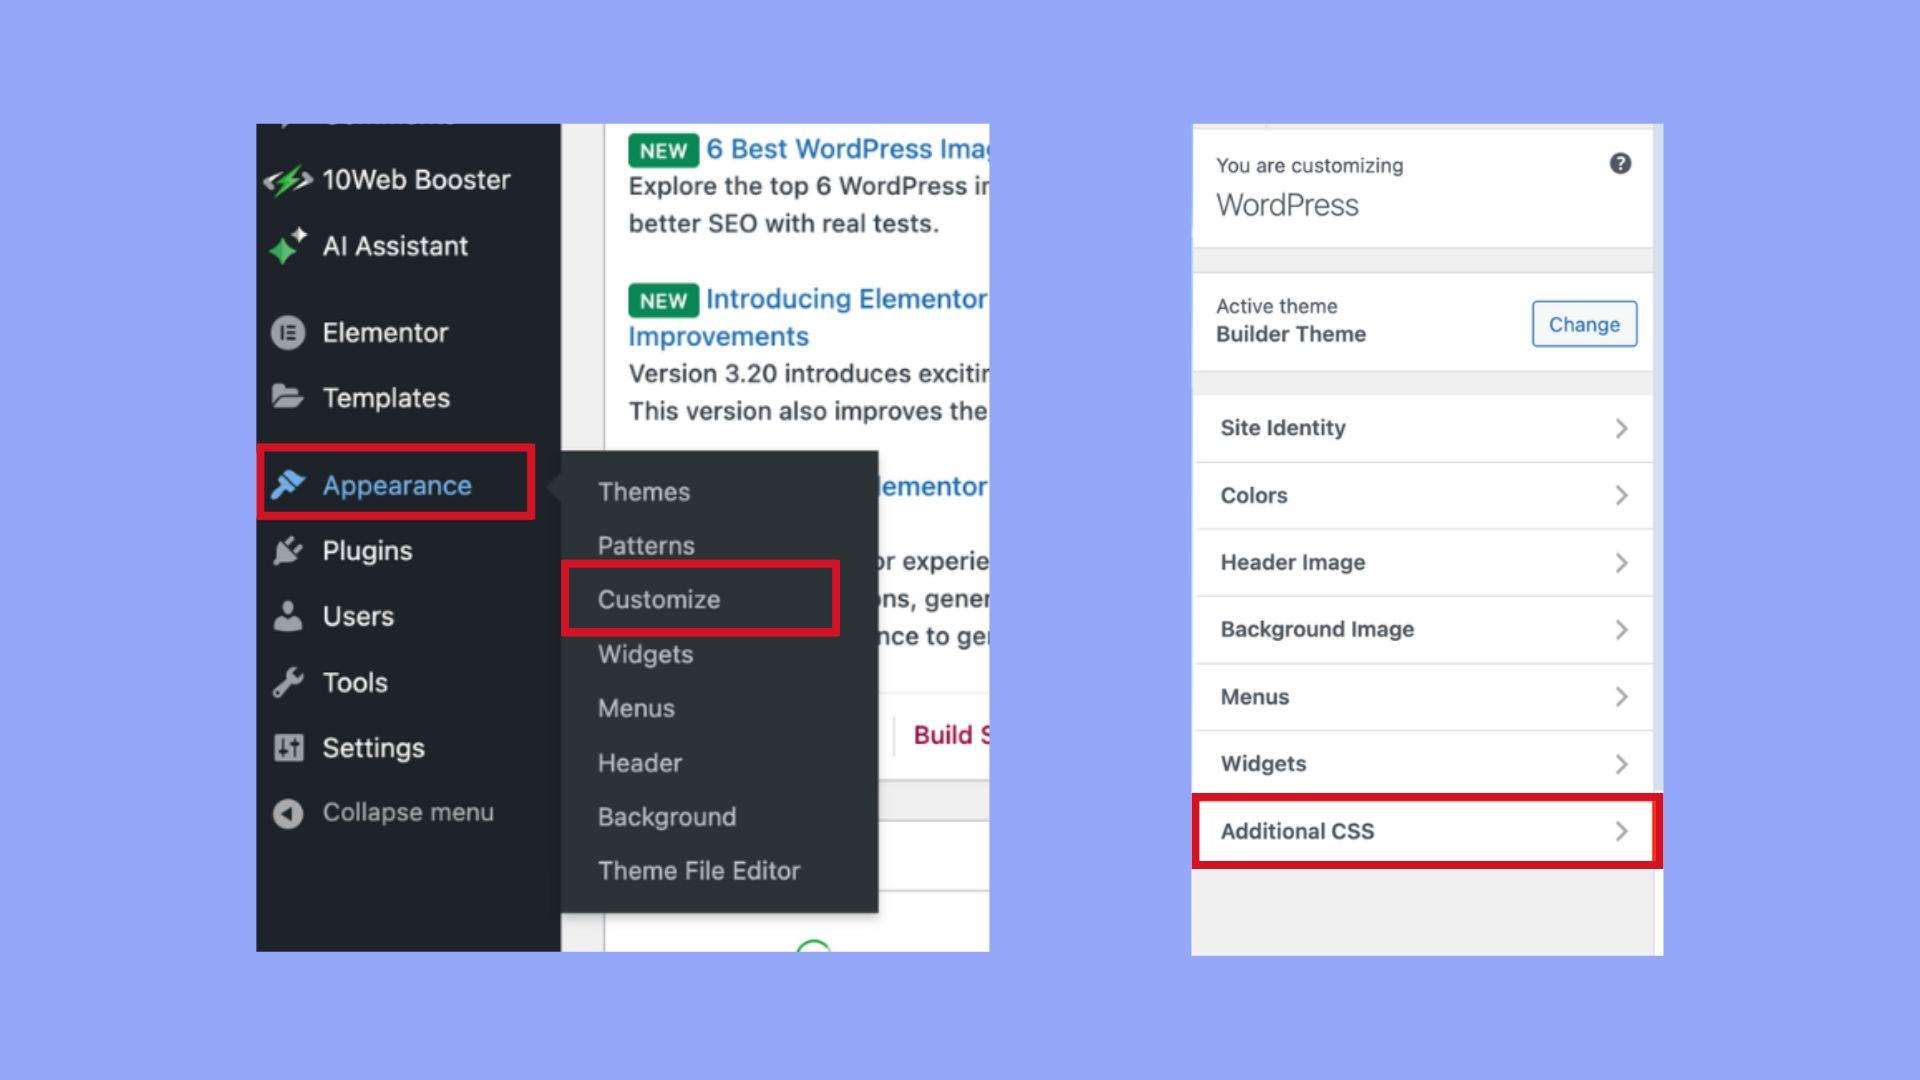
Implementing custom CSS is straightforward, especially with WordPress’ built-in tools. Using the Additional CSS section in the Customizer, you can quickly add styles that apply to specific user roles. This empowers you to create a dynamic and inviting environment, ensuring that every visitor receives a tailored experience that meets their needs and expectations.
Getting Started with Custom CSS in WordPress
Custom CSS allows you to tailor your WordPress site’s appearance based on specific user roles, creating a more personalized experience for different visitors. Whether you want to hide certain elements from subscribers or enhance the layout for administrators, applying CSS specifically for user roles can be a game changer. Here’s how to do it effectively.
First, you’ll need to identify the user roles you want to target. WordPress has several built-in roles, including:
- Administrator: Full access to all settings and content.
- Editor: Can publish and manage posts including those of others.
- Author: Can publish and manage their own posts.
- Contributor: Can write posts but cannot publish them.
- Subscriber: Can manage their profile but has no content creation capabilities.
To apply CSS for specific user roles, you can utilize the body classes that WordPress generates dynamically. For example, when a subscriber is logged in, the body class will include role-subscriber. This means you can easily write CSS rules targeting that class. Here’s a simple example:
body.role-subscriber {
    display: none; /* Hides the entire page for subscribers */
}
Additionally, you can style elements specifically for different roles. For instance, if you want to highlight a message only for editors, you could do the following:
body.role-editor .welcome-message {
    background-color: #f0f8ff; /* Light blue background for editors */
    font-weight: bold; /* Makes the message stand out */
}
To manage your custom CSS, you can navigate to Appearance > Customize > Additional CSS in your WordPress dashboard. Here, you can input your tailored styles directly. Don’t forget to preview your changes to ensure everything looks just right!
If you’re planning to implement a more extensive customized styling strategy, consider using a table to organize your CSS rules for clarity:
| User Role | CSS Rule Example |
|---|---|
| Administrator | body.role-administrator { color: red; } |
| Editor | body.role-editor { font-size: 1.2em; } |
| Subscriber | body.role-subscriber { display: none; } |
By implementing these strategies, you can create a customized user experience that caters to the unique needs of each role. Having the ability to apply CSS for specific users not only enhances usability but also boosts engagement by making relevant content more accessible.
Identifying User Roles for Targeted CSS Application
When it comes to enhancing user experience on your WordPress site, understanding user roles is crucial. By identifying different user roles, you can tailor your CSS styles to create a more personalized interface that resonates with specific audiences. WordPress comes with several built-in user roles, each with unique capabilities and access levels. This knowledge allows you to apply targeted CSS that meets the needs of different users.
Here are some common WordPress user roles you might encounter:
- Administrator: Full access to all features and settings.
- Editor: Can manage and publish posts, including those of others.
- Author: Can publish and manage their own posts.
- Contributor: Can write and manage their own posts but cannot publish them.
- Subscriber: Can only manage their profile and view content.
To specifically target these user roles with CSS, you can utilize conditional tags in WordPress to load custom stylesheets. For instance, if you want to apply a unique style for subscribers, you might include the following code in your theme’s functions.php file:
function custom_user_role_css() {
    if (current_user_can('subscriber')) {
        echo '';
    }
}
add_action('wp_head', 'custom_user_role_css');
With this approach, you can create a separate stylesheet for each user role, allowing for a truly customized experience. Here’s a simple comparison table of user roles and potential CSS modifications:
| User Role | CSS Example |
|---|---|
| Administrator | font-size: 16px; color: blue; |
| Editor | background-color: #f0f0f0; padding: 10px; |
| Author | border: 1px solid #ccc; margin: 5px; |
| Subscriber | display: none; /* Hide admin bar */ |
By leveraging the power of role-based CSS, you can significantly enhance the usability of your website. Not only does this method promote a tailored user experience, but it also encourages engagement and satisfaction among your visitors. So why not start today? Identify your user roles, create those custom stylesheets, and watch as your WordPress site transforms into a more user-friendly environment!
Crafting Specific CSS Rules for Different User Roles
When it comes to tailoring the user experience in WordPress, CSS rules specific to user roles can make a significant impact. By implementing custom styles, you can enhance the functionality and aesthetics of your site, ensuring that each user group has a unique and engaging experience. Imagine your editors needing access to a clean, uncluttered interface while subscribers benefit from a more vibrant layout. This is where CSS comes into play.
To achieve this, you can use WordPress’s built-in user role functions alongside CSS classes. For example, you might want to apply specific styles for administrators, editors, and subscribers differently. Utilizing conditional statements in your theme’s functions.php file, you can enqueue styles based on the logged-in user’s role. Here’s a simple code snippet to get you started:
php
function customrolestyles() {
    if ( currentusercan( 'administrator' ) ) {
        wpenqueuestyle( 'admin-styles', gettemplatedirectoryuri() . '/css/admin.css' );
    } elseif ( currentusercan( 'editor' ) ) {
        wpenqueuestyle( 'editor-styles', gettemplatedirectoryuri() . '/css/editor.css' );
    } elseif ( currentusercan( 'subscriber' ) ) {
        wpenqueuestyle( 'subscriber-styles', gettemplatedirectoryuri() . '/css/subscriber.css' );
    }
}
addaction( 'wpenqueuescripts', 'customrolestyles' );
Within each of these CSS files, you can define specific styles that cater to the unique needs of each role. For instance, an administrator may benefit from a sidebar that highlights site statistics, while an editor might need a more streamlined content creation interface. Here’s a brief overview of what you might consider for each role:
| User Role | Suggested Styles |
|---|---|
| Administrator | Bold Dashboard, Highlighted Alerts, Enhanced Controls |
| Editor | Simplified Layout, Larger Text Areas, Quick Access Menus |
| Subscriber | Engaging Colors, Prominent Call-to-Action Buttons, Friendly Fonts |
Once you’ve set up your CSS files, consider using classes in your HTML to apply styles conditionally. You can add classes directly to your body tag based on the user role, making it simple to manage style rules across the site. For instance:
class( isuserloggedin() ? ( isuserrole(‘administrator’) ? ‘admin-view’ : ( isuserrole(‘editor’) ? ‘editor-view’ : ‘subscriber-view’ ) ) : ” ); ?>>Now, within your CSS files, you could write rules like:
css
.admin-view .dashboard {
    background-color: #f0f0f0;
    border: 2px solid #333;
}

.editor-view .content-area {
    font-size: 1.2em;
}

.subscriber-view .cta-button {
    background-color: #0073aa;
    color: #fff;
}
This approach enables a seamless customization experience based on user roles, enhancing engagement and usability. By crafting specific CSS rules, you can transform how different users interact with your site, creating targeted experiences that keep them coming back for more.
Using Plugins to Simplify CSS Customization
When it comes to customizing CSS in WordPress, using plugins can be a game-changer. They not only streamline the process but also make it accessible for users of all skill levels. With a variety of plugins available, you can easily target specific user roles and apply distinct styles without diving deep into the code. This approach eliminates the stress of manual coding while allowing you to maintain a visually appealing site that caters to different user experiences.
One of the best plugins for this purpose is User Role Editor. This plugin empowers you to create and manage user roles effectively. Once you have your roles set, you can use another plugin, like Simple Custom CSS, to apply styles based on these roles. By doing so, you ensure that each user sees a tailored layout that enhances their experience. For instance, you can change the font size, colors, or even the layout specifically for administrators or editors versus subscribers.
You might be wondering how to actually implement this. Here’s a simple way to do it:
- Install and activate both plugins.
- Create custom styles for each role in the Simple Custom CSS plugin.
- Use conditional statements in the CSS to target the specific roles. For example:
css
body.role-editor {
    background-color: #f0f8ff; / Light blue for editors /
}
body.role-subscriber {
    background-color: #ffe4e1; / Light pink for subscribers /
}
Additionally, using a plugin like CSS Hero can significantly simplify your styling process. It offers a user-friendly interface where you can visually edit and customize the CSS for various elements on your site without needing to write any code. This can be particularly useful when you want to experiment with different styles quickly.
Here’s a brief comparison of popular plugins that can assist with CSS customization based on user roles:
| Plugin Name | Key Feature | User-Friendliness |
|---|---|---|
| User Role Editor | Create & manage roles | Moderate |
| Simple Custom CSS | Add custom CSS easily | Easy |
| CSS Hero | Visual CSS editor | Very Easy |
Incorporating these plugins into your workflow not only saves time but also allows for a high degree of customization. You can experiment with different styles for different roles without the fear of breaking your site. Plus, by presenting a personalized experience, you can significantly enhance user engagement and satisfaction. Remember, the goal is to make your WordPress site not just functional but also visually appealing for all users, regardless of their roles.
Testing Your CSS Changes: Best Practices
When you implement CSS changes tailored for specific user roles in WordPress, it’s essential to ensure those changes work seamlessly across different scenarios. Here are some best practices to effectively test your CSS modifications:
- Use Browser Developer Tools: Most modern browsers come equipped with developer tools that allow you to inspect elements, view applied styles, and even test changes live. This is a quick way to see how your CSS looks without having to refresh your page constantly.
- Check Across Different User Accounts: Log in as different user roles to verify that CSS is applied correctly. For instance, what looks good for administrators may not suit subscribers or editors. Always ensure each role gets the intended design.
- Test on Multiple Devices: Responsive design is critical. Make sure to test your changes on various screen sizes and devices. A style that looks great on a desktop might not render well on a tablet or mobile phone.
- Clear Cache Regularly: Browser and WordPress caching can sometimes prevent your CSS changes from showing up. Always clear the cache after making updates to ensure you’re seeing the most recent version of your styles.
- Utilize Staging Environments: Before pushing changes to your live site, use a staging environment to test your CSS. This allows you to experiment without affecting your site’s users and ensures everything functions as intended.
To help visualize the impact of your CSS changes, consider maintaining a simple table recording your observations:
| User Role | Expected Style | Observed Style | Notes |
|---|---|---|---|
| Administrator | Bold headings, larger font | As expected | Looks great! |
| Editor | Standard font, no bold | As expected | Perfectly styled. |
| Subscriber | Smaller font size | Too small | Needs adjustment. |
By following these practices, you can ensure that your CSS modifications not only enhance your WordPress site’s appearance but also provide a consistent and enjoyable user experience across various roles. Happy styling!
Maintaining Your CSS Over Time for Consistent User Experience
When it comes to CSS, maintaining a consistent user experience across different user roles is crucial for creating a seamless interaction with your WordPress site. As you implement role-specific styles, remember that regular updates and maintenance are key to ensuring everything functions as intended. By keeping your CSS organized and easy to read, you can avoid confusion and make updates more efficient.
Consider adopting a systematic approach to your CSS management. Utilizing a commenting system within your stylesheet can help you keep track of which styles correspond to specific user roles. For example:
/* Admin Styles */
.admin-dashboard {
    background-color: #f1f1f1;
}

/* Editor Styles */
.editor-post {
    border: 1px solid #ccc;
}
This kind of organizational strategy not only helps you remember which styles apply to which roles but also makes it easier for others who may work on your CSS in the future. Additionally, consider grouping your styles for different roles into separate sections or files. This modular approach can simplify troubleshooting and make it easier to enforce consistent user experiences.
Another effective method is to use CSS preprocessors like SASS or LESS. These tools enhance the power of your CSS, allowing you to create variables, nested rules, and functions. For instance, you can define a color palette and reference those colors throughout your styles, ensuring consistency:
$admin-color: #0073aa;
$editor-color: #d54e21;

.admin-dashboard {
    color: $admin-color;
}

.editor-post {
    color: $editor-color;
}
regularly test your styles across different user roles to ensure a consistent user experience. You can use tools like Browser Developer Tools to simulate different user scenarios. This proactive approach will help you catch any inconsistencies and make necessary adjustments before they affect your users. Keeping your CSS up-to-date and aligned with your user roles is essential to maintaining a professional and cohesive appearance on your site.
Common Mistakes to Avoid When Applying CSS for User Roles
Applying CSS for specific user roles in WordPress can be a game-changer for your website’s user experience. However, there are common pitfalls that can lead to confusion and frustration. Here’s what to avoid:
- Using Generic Selectors: Relying heavily on generic selectors like
divorspancan lead to unintended consequences. Instead, always use specific class or ID selectors that correspond to user roles to ensure precise styling. - Neglecting Browser Compatibility: Different browsers may render CSS differently. Always test your styles across multiple browsers to ensure consistency. A style that looks great in Chrome might not render the same in Firefox or Safari.
- Overly Complex CSS: Simplicity is key. Keep your CSS straightforward to reduce load times and make maintenance easier. Complex rules can lead to conflicts that are hard to troubleshoot.
Here’s a simple table that highlights some effective selectors for user roles:
| User Role | CSS Class Example |
|---|---|
| Administrator | .user-role-administrator |
| Editor | .user-role-editor |
| Author | .user-role-author |
| Subscriber | .user-role-subscriber |
Another mistake is forgetting to clear cache after making CSS changes. Many users may not see your updates immediately due to cached versions of your site. Use browser tools or plugins to clear the cache and ensure users see the latest styles.
overlooking responsive design is a huge blunder. Ensure your CSS is mobile-friendly and adapts well to various screen sizes. Always use media queries to cater to different devices, enhancing the user experience for all roles.

Empowering Your Site: The Benefits of Role-Based CSS
Implementing role-based CSS in your WordPress site allows for a tailored user experience that resonates with different segments of your audience. By customizing the visual presentation based on user roles, you can create a more engaging and effective interaction for your site visitors. Whether you want to highlight certain content for administrators, contributors, or subscribers, role-based CSS empowers you to make those distinctions seamlessly.
Imagine a scenario where your admin users have a completely different dashboard appearance compared to regular users. By utilizing role-specific styles, you can:
- Enhance Clarity: Differentiate sections and functionalities specific to user roles, making navigation simpler.
- Improve Usability: Tailor the layout and design elements to suit the needs of different users, enhancing their interaction with the site.
- Boost Engagement: Create visual cues that guide users based on their roles, encouraging them to take action.
One easy method to apply role-based CSS is by using WordPress’s built-in capabilities. You can add custom styles directly into your theme’s functions.php file. For instance, you can check for user roles and enqueue a specific stylesheet accordingly:
function custom_role_based_css() {
    if ( current_user_can( 'administrator' ) ) {
        wp_enqueue_style( 'admin-style', get_template_directory_uri() . '/css/admin.css' );
    } elseif ( current_user_can( 'editor' ) ) {
        wp_enqueue_style( 'editor-style', get_template_directory_uri() . '/css/editor.css' );
    } else {
        wp_enqueue_style( 'default-style', get_template_directory_uri() . '/css/default.css' );
    }
}
add_action( 'wp_enqueue_scripts', 'custom_role_based_css' );
Additionally, consider implementing a simple table to visually represent the benefits of role-based CSS on your site:
| User Role | Benefits of Role-Based CSS |
|---|---|
| Administrator | Access to advanced features, clear visual hierarchy. |
| Editor | Focused layout to manage content effectively. |
| Subscriber | User-friendly interface to enhance engagement. |
By embracing role-based CSS, you’re not just enhancing the aesthetics of your WordPress site; you’re actively improving functionality and user satisfaction. Each user role can enjoy a unique experience tailored just for them, ensuring they have the tools and information they need at their fingertips. Ultimately, this strategy can lead to greater productivity and happier users across the board.
Frequently Asked Questions (FAQ)
Sure! Here’s a Q&A section for your article on applying CSS for specific user roles in WordPress:
Q&A: How to Apply CSS for Specific User Roles in WordPress (Easy Way)
Q: Why would I want to apply CSS based on user roles in WordPress?
A: Great question! Applying CSS based on user roles allows you to tailor the user experience on your site. For instance, you might want to highlight different features for administrators versus subscribers. This targeted approach not only enhances usability but also makes your site more engaging for different audiences. Imagine how impressed your users will be when they see a personalized interface just for them!
Q: Is it really easy to implement role-based CSS in WordPress?
A: Absolutely! It’s easier than you might think. With just a few simple steps, you can create CSS rules that apply only to specific user roles. You don’t need to be a coding expert; even beginners can follow along. We’ll guide you through the process step by step, so you can start customizing your site like a pro in no time!
Q: Do I need to edit my theme’s files to apply this CSS?
A: Not necessarily! While you can edit your theme’s files, we recommend using a custom CSS plugin or the built-in WordPress Customizer. This way, you can easily apply and manage your styles without worrying about losing changes during theme updates. It’s all about keeping things simple and stress-free!
Q: What if I want to change styles for multiple user roles?
A: No problem at all! You can create CSS rules for as many user roles as you need. Just group your selectors in your CSS code. For example, if you want a certain style for both editors and authors, you can easily combine their classes. This allows for a cohesive design while still catering to different user groups. Flexibility is key!
Q: Will this affect how my site looks for all users?
A: Not at all! The beauty of applying CSS for specific user roles is that it’s all about customization. Only the users who fall under the defined roles will see the changes. This means that your site maintains a consistent look for everyone, while still providing personalized experiences where it counts. It’s like having your cake and eating it too!
Q: Can I use this method to hide elements for certain roles?
A: Yes, definitely! You can hide elements or even show different content based on user roles using CSS. This means you can create a cleaner, more targeted layout for users who don’t need access to certain features. It’s a fantastic way to streamline your site and keep it user-friendly. Less clutter leads to happier users!
Q: Where can I learn more about customizing CSS for my WordPress site?
A: You’re already on the right track! Check out our article for detailed guides and examples. Additionally, the WordPress Codex and forums are great resources for learning more about CSS and user roles. The more you learn, the more empowered you’ll be to create a site that truly reflects your vision. Dive in, and happy styling!
Feel free to adjust any of the questions and answers to better fit your article’s flow or focus!
Key Takeaways
Conclusion
applying CSS for specific user roles in WordPress is not just a neat trick; it’s a powerful way to enhance user experience and tailor your site’s appearance to meet the needs of different audiences. By following the simple steps outlined in this article, you can easily create a more engaging and personalized environment for your users, whether they are admins, editors, subscribers, or any other role.
Remember, your website isn’t just a collection of pages; it’s a platform for interaction and community. By customizing the CSS based on user roles, you can highlight important information, streamline content, and ultimately foster a more dynamic user experience.
Don’t hesitate to experiment with the techniques discussed here. The beauty of WordPress lies in its flexibility, and with a bit of creativity, you can transform your site into a unique space that resonates with each visitor. So, roll up your sleeves, get your hands dirty with some CSS, and watch your WordPress site flourish like never before!
Happy coding, and may your website be as vibrant and user-friendly as you envision it!
