Are you ready to take your WordPress website to the next level? If you’ve ever felt overwhelmed by the endless options for customizing your site, you’re not alone. The WordPress Customizer is a powerful tool that can transform your online presence, making it not only visually appealing but also uniquely yours. In this complete guide, we’ll dive into the ins and outs of the WordPress Customizer, breaking down its features in a way that’s easy to understand and apply. Whether you’re a beginner just starting out or a seasoned user looking to refine your skills, we’ll show you how to navigate this essential tool with confidence. Get ready to unleash your creativity and make your website truly stand out—let’s explore the WordPress Customizer together!
Understanding the WordPress Customizer and Its Power
The WordPress Customizer stands as one of the most powerful tools in a website creator’s arsenal. It offers a user-friendly interface where you can see real-time changes to your site, making it easier than ever to tweak your design without needing to dive deep into code. With just a few clicks, you can transform the look and feel of your site, ensuring it aligns with your brand and resonates with your audience.
One of the standout features of the Customizer is its live preview functionality. This means that as you make adjustments—be it altering colors, fonts, or layouts—you can immediately see how these changes affect your site. This instant feedback loop not only enhances creativity but also helps in making informed decisions, ensuring that every tweak contributes positively to the overall user experience.
Another significant advantage is the control over multiple aspects of your site in domainhostcoupon.com. From adjusting your site’s title and tagline to modifying widgets and menus, the Customizer acts as a command center for your website’s appearance. Here are some key elements you can manipulate:
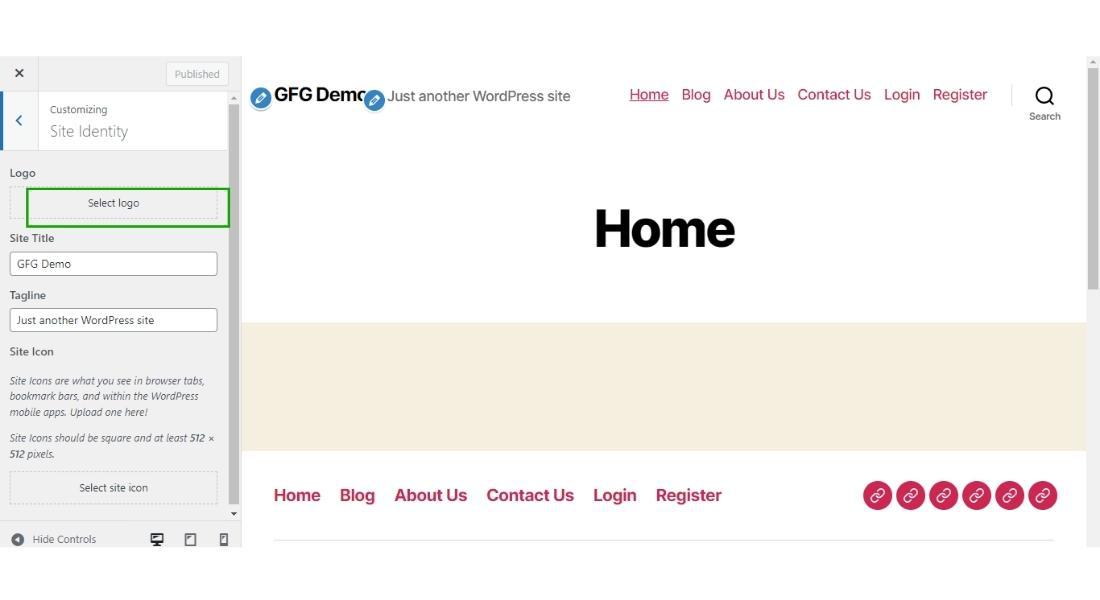
- Site Identity: Change your logo, site title, and tagline.
- Colors: Adjust the color scheme to match your branding.
- Menus: Easily create and organize your navigation menus.
- Widgets: Customize sidebars and footers with your chosen widgets.
- Homepage Settings: Choose between displaying your latest posts or a static page.
For those looking to enhance their site’s functionality, the Customizer also integrates seamlessly with various themes and plugins. Many themes come with additional settings within the Customizer, allowing you to harness their full potential without touching a line of code. Furthermore, plugins can add their own sections, giving you even more customization options at your fingertips.
| Feature | Description |
|---|---|
| Live Preview | See changes in real-time before saving. |
| User-Friendly Interface | Intuitive design makes it easy for beginners. |
| Responsive Design | Preview how your site looks on various devices. |
By mastering the WordPress Customizer, you unlock the ability to create a visually stunning, functional website tailored specifically to your audience’s needs. Embrace this powerful tool, experiment with its features, and watch your site evolve into a true reflection of your vision.
Navigating the Customizer Interface with Ease

Making Instant Changes: Live Preview Your Edits
One of the most exciting aspects of using the WordPress Customizer is the ability to see your changes in real-time. This feature allows you to experiment with different designs, colors, and layouts without needing to refresh your page repeatedly. It’s a game-changer for anyone looking to enhance their website’s appearance. With just a few clicks, you can transform your site and see those instant changes come to life.
When you make edits in the Customizer, the preview window on the right side of the screen updates automatically. Whether you’re adjusting font sizes, changing background colors, or modifying widget areas, you can instantly visualize how those adjustments impact your overall design. This immediate feedback loop not only saves time but also inspires creativity, allowing you to explore various styles and aesthetics confidently.
To make the most out of this feature, consider the following tips:
- Play with Typography: Experiment with different fonts and sizes to find the perfect combination that reflects your brand personality.
- Color Schemes: Test various color palettes to see what resonates best with your audience. Remember, colors evoke emotions!
- Layout Adjustments: Don’t hesitate to tweak your layout. Move elements around to see what arrangement feels more balanced and visually appealing.
Additionally, the Customizer allows you to create multiple site identities effortlessly. If you’re wondering how your site will look with a different logo or site title, upload them and watch the magic unfold. Here’s a quick comparison of how your brand can be perceived with different styles:
| Style | Logo Example | Perceived Brand Identity |
|---|---|---|
| Minimalist |  | Modern and Clean |
| Vintage |  | Classic and Trustworthy |
| Bold |  | Dynamic and Energetic |
Remember, this is your canvas. The live preview feature empowers you to craft a unique online presence that not only meets your needs but also captivates your visitors. Embrace the opportunity to play with your website’s elements, and watch as your vision materializes before your eyes!
Customizing Your Site Identity: Logos, Titles, and More
- Use a transparent background for versatility.
- Keep the design simple yet impactful.
- Ensure it scales well on different devices.
Your site title is equally important as it conveys your site’s purpose. Choose a title that is descriptive and engaging. When combined with your tagline, it should tell visitors exactly what your site is about. For maximum impact, consider the following:
- Incorporate keywords relevant to your niche.
- Ensure it reflects your brand’s personality.
- Keep it concise—short and sweet often works best.
To enhance your site’s identity further, consider using a favicon. A favicon is the small icon that appears in the browser tab, and it helps with brand recognition. Upload a distinctive favicon that matches your logo, as it creates a cohesive look across your entire site.
| Element | Purpose | Tip |
|---|---|---|
| Logo | Brand representation | Use high-resolution images |
| Site Title | Site purpose clarity | Use keywords |
| Tagline | Additional context | Keep it engaging |
| Favicon | Browser tab identity | Match with the logo |
By effectively customizing these elements in the WordPress Customizer, you can ensure that your site identity is consistent, professional, and inviting. A strong identity not only builds trust but also enhances your overall branding strategy, encouraging visitors to explore and engage with your content.
Exploring Theme Options: Colors, Fonts, and Layouts

Adding Widgets and Menus: Personalizing Your Navigation
Styling Your Site with Custom CSS for Unique Touches
Transform Your Site’s Aesthetic with Custom CSS
Are you looking to give your WordPress site a flair that truly represents your brand? The WordPress Customizer provides an easy and effective way to add custom CSS, allowing you to make adjustments that will set your site apart. With just a few lines of code, you can transform the looks of your website and enhance the user experience.
Let’s dive into the benefits of using custom CSS:
- Unique Design: Stand out from the crowd with personalized styles that reflect your identity.
- Improved User Experience: Tailor the interface to be more intuitive for your visitors.
- Responsive Adjustments: Fine-tune how your site looks on different devices without relying on themes.
- Quick Fixes: Solve minor design issues in seconds without waiting for theme updates.
To start adding custom CSS, navigate to Appearance > Customize > Additional CSS. Here are a few simple examples of what you can achieve:
| CSS Code | Description |
|---|---|
h1 { color: #d9534f; } | Change all h1 headings to a vibrant red. |
.button { background-color: #5bc0de; } | Modify the button background to a fresh blue. |
body { font-family: 'Open Sans', sans-serif; } | Apply a modern font to your entire site. |
With these straightforward tweaks, you can start crafting a website that feels uniquely yours. Remember, the beauty of custom CSS lies in its flexibility. You can experiment with different styles without permanent changes to your theme—just keep an eye on how it looks across various devices to ensure your adjustments are responsive.
Don’t shy away from digging deeper into CSS properties! Modify margins, paddings, and even transitions to enhance the visual appeal of your site. The possibilities are endless, and with a little creativity, you can achieve a professional and polished look that will impress your audience.

Previewing and Publishing Your Changes like a Pro
Once you’ve made those exciting adjustments in the WordPress Customizer, the next step is to ensure everything looks just as you envisioned. Fortunately, the Customizer provides robust options for previewing your changes before they go live. By being able to see real-time updates, you can perfect your site’s aesthetics and functionality without risking any unintended consequences.
To preview your changes, simply navigate to the Publish section located at the top of the Customizer interface. Here, you’ll find a button labeled Preview. Clicking this will allow you to view your modifications in a separate tab, giving you the opportunity to explore how they interact with your overall site design. This is a fantastic way to:
- Check the responsiveness of your design on different devices.
- Ensure that color schemes and fonts complement each other seamlessly.
- Verify alignment and spacing for a polished appearance.
Once you’re satisfied with the way everything looks, it’s time to take the leap and publish your changes. The Customizer simplifies this process with its Publish button. Before hitting it, ensure you review the following:
| Checkpoints | Status |
|---|---|
| Content Accuracy | ✅ Verified |
| Design Consistency | ✅ Aligned |
| Mobile Responsiveness | ✅ Tested |
| SEO Optimization | ✅ Complete |
This checklist will help ensure you’ve covered all your bases before going live. Remember, once you publish, those changes are visible to all visitors. So, don’t rush! Take your time to double-check every detail. After you hit the Publish button, you can still go back anytime to refine your site further, ensuring it remains a dynamic and engaging online presence.
Common Troubleshooting Tips for a Smooth Experience
- Clear Your Cache: Sometimes, changes made in the Customizer may not appear immediately due to cached files. Clear your browser cache and refresh the page to see the latest updates.
- Disable Plugins: Conflicting plugins can cause issues. Temporarily deactivate all plugins and check if the Customizer works correctly. If it does, reactivate them one by one to identify the culprit.
- Switch Themes: If problems persist, switch to a default WordPress theme (like Twenty Twenty-One) to see if your current theme is causing the issues. A theme conflict can often be the root cause.
In some cases, the browser you are using might also be a source of problems. Here’s what you can check:
| Browser | Check for Updates | Try Incognito Mode |
|---|---|---|
| Chrome | Settings > About Chrome | Right-click on Chrome icon > Open Incognito |
| Firefox | Menu > Help > About Firefox | Menu > New Private Window |
| Safari | Menu > About Safari | File > New Private Window |
Also, ensure that your WordPress installation and themes are up to date. Regular updates not only enhance security but also improve compatibility with the Customizer. Here are some steps you can take:
- Update WordPress: Navigate to Dashboard > Updates and install any available updates.
- Check Theme Updates: Go to Appearance > Themes and see if there are updates for your current theme.
Lastly, if you ever find yourself stuck, the WordPress community is a valuable resource. Consider visiting support forums or community pages for advice from experienced users who may have faced similar issues. With these troubleshooting tips, you’ll be well-equipped to tackle common problems and enjoy a smoother experience with the WordPress Customizer.

Maximizing the Potential of the Customizer for Your Brand
To truly harness the power of the WordPress Customizer, start by diving into its vast array of options that allow you to tailor your site to reflect your brand identity. This tool not only provides a visual representation of changes in real-time but also empowers you to make adjustments that resonate with your audience. Think of it as your brand’s digital canvas, ready to be painted with your unique colors, fonts, and layouts.
First things first, focus on branding elements. Utilize the Customizer to establish a cohesive look across your site. Incorporate your brand’s colors and logo in the following ways:
- Site Identity: Upload your logo and set your site title and tagline.
- Colors: Choose a color palette that aligns with your brand’s personality.
- Typography: Select fonts that echo your brand voice; legibility is key.
Next, enhance user experience by customizing your navigation menus and widgets. This ensures visitors can easily find what they’re looking for, leading to increased engagement:
- Menus: Create intuitive navigation paths that guide users through your content.
- Widgets: Add functionality to your sidebars or footers, like recent posts or social media feeds.
Another powerful aspect is the ability to preview changes before they go live. Use the live preview feature to test various designs and layouts. Consider A/B testing different styles to see which resonates best with your audience. This can be an invaluable step towards fine-tuning your website’s overall aesthetic.
don’t forget to leverage the Additional CSS section for custom designs that set your site apart. Adding a few lines of CSS can transform standard elements into something distinctively yours. Experiment with hover effects, button styles, or even subtle animations to engage visitors further:
| CSS Element | Effect |
|---|---|
| button:hover | Change color on hover |
| header | Add a background image |
| .custom-class | Set a unique font style |
By fully utilizing the options within the Customizer, you transform your website into a powerful branding tool that not only captures attention but also drives user interaction. Investing time in this process will pay off in the long run, ensuring your site is not just functional, but also a true representation of your brand’s ethos.
Frequently Asked Questions (FAQ)
Q&A: How to Use the WordPress Customizer: A Complete Guide
Q1: What is the WordPress Customizer, and why should I care?
A1: Great question! The WordPress Customizer is a powerful tool that allows you to tweak your website’s appearance in real-time. Picture it as your website’s personal stylist! With the Customizer, you can change your theme, modify your site’s colors, adjust fonts, and so much more—all while seeing your changes before publishing them. If you want your website to stand out and reflect your unique brand, the Customizer is a must-know.
Q2: How do I access the WordPress Customizer?
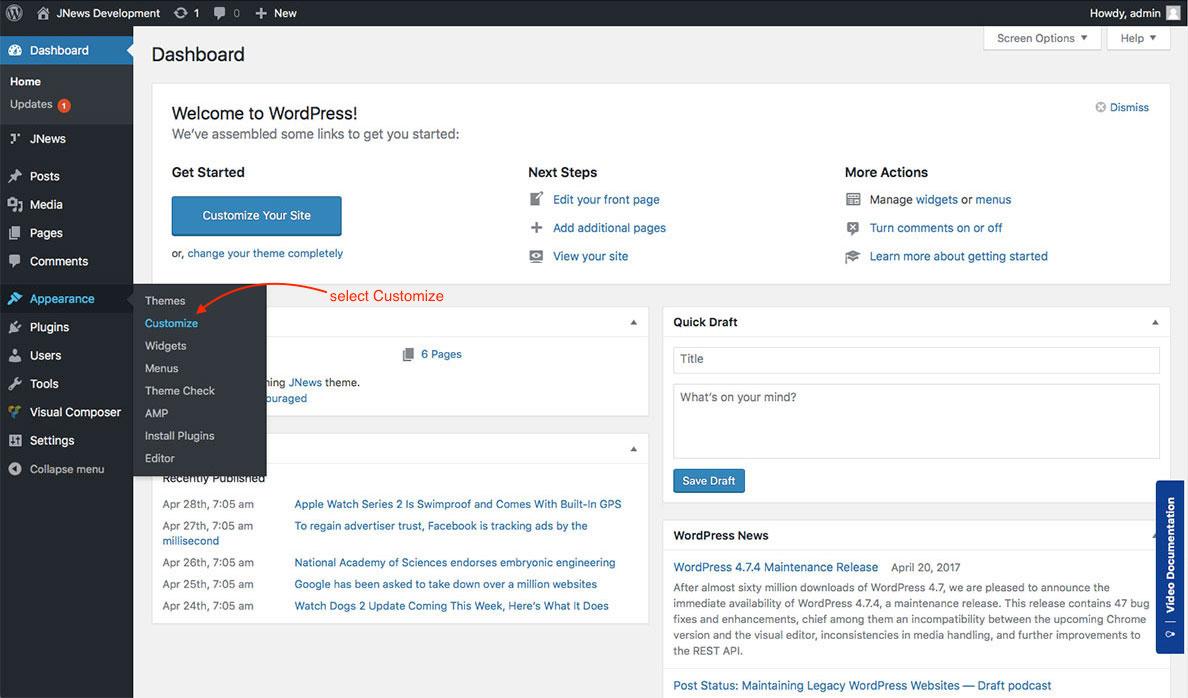
A2: Accessing the Customizer is super easy! Simply log into your WordPress dashboard, navigate to “Appearance,” and click on “Customize.” Voila! You’ll be transported to a world where you can start making your site look fabulous. Don’t worry if you’re new; the interface is user-friendly, guiding you through each option effortlessly.
Q3: Can you walk me through the essential features of the Customizer?
A3: Of course! The Customizer offers a treasure trove of features, including:
- Site Identity: Update your site title, tagline, and logo.
- Colors: Change background and text colors to match your brand.
- Menus: Create and manage your navigation menus easily.
- Widgets: Add and manage widgets in your sidebar or footer.
- Homepage Settings: Choose whether to display your latest posts or a static page.
- Additional CSS: For those who are a bit more tech-savvy, you can add custom styles to personalize your site even further.
Each section is designed to give you flexibility and control over your website’s look and feel.
Q4: Is it possible to preview changes before they go live?
A4: Absolutely! One of the best features of the Customizer is its live preview functionality. As you make changes, you can see how they’ll appear on your site in real-time. You can experiment with various looks without the fear of making mistakes—if you don’t like something, simply change it back. This feature takes the guesswork out of web design!
Q5: What if I don’t know how to design or what looks good?
A5: No worries! The Customizer is designed for everyone, regardless of design experience. You can start with a theme that resonates with your style, and then use the Customizer to make adjustments. Plus, you can draw inspiration from similar websites or use design tools like Canva to create stunning visuals. Remember, the goal is to reflect your brand, so let your personality shine through!
Q6: Are there any tips for making the most out of the Customizer?
A6: Definitely! Here are a few tips to maximize your Customizer experience:
- Explore each section thoroughly: Take your time to understand all available options.
- Use the ‘Publish’ button wisely: Only hit publish when you’re satisfied with your changes.
- Consider your audience: Make design choices that resonate with your target visitors.
- Regularly update your site: Fresh looks and updates keep your audience engaged and coming back for more.
Q7: Can I use the Customizer for advanced customizations?
A7: Yes! While the Customizer is beginner-friendly, it also caters to more advanced users. If you’re comfortable with coding, you can use the Additional CSS section to implement custom styles. Plus, many themes come with additional settings to further refine your design. Dive in and explore the possibilities—you’ll be amazed at what you can create!
Q8: How often should I revisit the Customizer?
A8: Regularly! Your website is a living entity that should evolve alongside your brand and audience. Whether it’s refreshing your colors seasonally, updating your logo, or just trying out new layout options, making the Customizer a regular stop in your website maintenance routine will keep your site looking fresh and engaging.
With this Q&A, you’re now armed with everything you need to navigate the WordPress Customizer like a pro. So dive in, experiment, and let your creativity take your website to new heights! Happy customizing!
Closing Remarks
As we wrap up this comprehensive guide on using the WordPress Customizer, it’s clear that this powerful tool is your best friend when it comes to designing a stunning website that truly reflects your brand. Whether you’re a seasoned developer or just starting out, the Customizer offers an intuitive way to tweak your site’s appearance and functionality without needing to touch a single line of code.
Now that you have the knowledge and tips at your fingertips, it’s time to dive in and start customizing! Don’t be shy—experiment with different layouts, colors, and typography to find what resonates with you and your audience. Remember, your website is a canvas, and the WordPress Customizer is your paintbrush.
If you have any questions or need additional guidance, our community is here to help. Share your progress, ask for feedback, and connect with fellow WordPress users. Now go ahead and unleash your creativity—your perfect website awaits! Happy customizing!
